Saturday, August 31, 2013

It is labor day weekend and that means fall is right around the corner. Where in the world did summer go? August wasn't very summerlike here in RI, more like Sept.
I have slowed down a bit on crafting to get ready for the holiday swaps that will be coming up on the Cricut MB.
So while I am in between swaps, I continue making  cards for Cards for Soldiers. We can make everyday cards any time and then do specialty ones when they post a new themes. We just finished up Christmas in July and have moved on to Fall cards.
I am not a fancy card maker especially if I want to make quite a few. I tend to go simple with most of my cards and my layouts also. (Once in awhile I do amaze myself)
I sometimes like to use photos on cards so I decided to print some out and use a grid.  I found a grid in the new Artbooking Cartridge and printed it out at 5". I had to trim it once I  had it glued  to the picture but that worked out well. Just a little stamped sentiment and the cards are good to go. I used different cardstock from a fall colored stack that I had.


 I also tried out a masking technique. First you use markers to ink up your stamp. Doesn't matter where you put the colors really. They will all come out a bit different!!!! Stamp on the center of your cardstock. Take a cut out of the leaf and tape it over where you stamped. (I use removable scotch tape.) I then take some 1/4" tape and put it in a pattern around the edges. Once I have that done, I stamp over the whole thing with a script stamp. Before removing any of the tape or leaf pattern, I ink it up using my TH distress ink. Then I remove all the tape and the leaf. Not bad for my first try but next time I'll try to add a bit more  orange, green, yellow to the leaf as it looks too read to me.
Finally I took some of my scraps and punched out some circles and hearts to make these cards. Hearts are supposed took like a bunch of balloons!!!! The circles were punched from embossed papers I had stashed away.


So that is my card making for the last few days. I have a few more hearts and circles so I'll make a few more
 
Happy crafting everyone!!!!! 
 

Monday, August 19, 2013

I wanted to go ahead and post my 3 ATCs that are for my Fall swap that is finishing up this weekend.
I like to give everyone a challenge when they make these little works of art!!!!
Group 1 theme was APPLES and the style was VINTAGE. The challenge-- NO LACE

Group 2 theme was LEAVES and the style was GRUNGE. The challenge- NO BROWN

Group 3 theme was PUMPKINS and the style was STEAMPUNK. The challenge-NO GEARS

I have received some really cool looking ATCs so far and I will post the pictures once the swap has closed and they are all mailed back.

I used corkboard and  frayed some fabric which I stamped on my image for Group 1. I colored in just the apples and a little green grass..

For group 2, I used leaf cuts, a couple pieces of textured materials and covered them with metal tape. I emphasized it all with a  round tip and then painted it black. I wiped off some black and then added some orange and yellow and did the same thing. I added black chunky EP around the edges for a more grunge look.

For Group 3,  I used a pumpkin pie as the top of a heat embossed hot air balloon which I added wings to. Some mixed embossing powders finished it off.

Hope you like them and will check the thread on the Cricut Message Board to see how everyone else interpreted this ATC challenge.

Die cut projects

I am back from a couple busy weeks with crafting, summer cleaning, etc. Plus I have enjoyed this cool weather!!!!

I finished up my Cards for soldiers and also my Die cut swap projects. We had to use die cuts and make 3 projects for a partner. Because my partner likes Halloween, I decided to try a haunted house scene that I had seen on the Sizzix blog.  I used about 7 different die cuts, inked and heat embossed some of them to make that grungy look! I like how it came out and it was certainly fun putting it together.
 
 
 My partner sent me a picture of something she saw on the internet and  liked but  I wasn't sure if I could do it or not. I tried it and while it came out OK! I wasn't happy with the way the pages split. I used a large TH pumpkin die and cut out a paperback book in that shape. I inked the pages and then opened up the book and glued it to a stick forming the round pumpkin. I added some greenery and acorns to finish it off.
 

My 3rd project was a small shadow box using the bottom of a wooden box. I used tree die cuts, deer die cut and a star die cut. The deer and star were covered with tissue paper and inked. The tree cuts were painted and then snow was added. The 3D trees were TH and I used the same paint on them as the other trees. Again I added snow. All assembled it came out very festive looking.

Monday, August 5, 2013


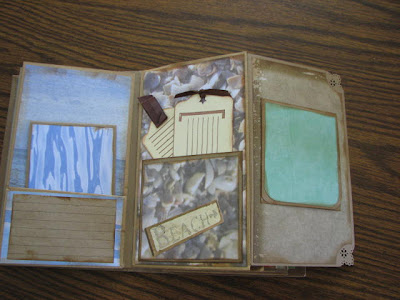
I decided to try my hand at making a Vertical Mini Paper bag album. I found the videos instructions on You Tube and it didn't look too complicated. I am pretty intimidated by minis because the ones I have seen finished are beautiful and the couple I have done are just so-so. I am not big into embellishing these minis so this one looked to be right up my alley. LOL I followed along with all 6 of the videos and found that is wasn't complicated at all. The person doing the video took you step by step all the way from the beginning to the end. I actually think anyone can do this one!!!!
I will say that it is very time consuming!!!!! You have LOTS of papers to cut and you use LOTS of Scor tape. I also inked all my paper edges so that took time also. I like how my paper pack had some beachy  papers along with the other papers.
It comes out VERY sturdy and you end up with spots for at least 75 photos and journaling. I also added a couple more fold outs so that adds a few more spots. I didn't use many embellishments and the ones that I did use are not too 3D. I wanted the focus to be on the photos and the story being told.

 Thanks for looking. I doubt you will have any questions after watching the video, but feel free to ask me if you have one.
I will add the link to the You Tube instructions at the end of this post.

Here is the front, the whole thing fanned out and then some of the pages. The back cover has what is called a Waterfall  card. Added room for more pictures!!!Sorry for a couple blurry pics!!!!
Forgot to say that I do have to add my tabs.


Here is the link so you can make one for yourself!!!!!!!
 
Hello everyone,
I have been trying to get some Cards for Soldiers finished so I can mail them off this week. It has been so hot lately that I haven't been into Christmas!!!!!
This week there has been a cool down and it was actually 55 this morning!!!! So I have a bunch of cards ready to mail!!!! Here are my latest ones. I used the same design with different papers and I don't know which one I like better! I used the Winter Woodlands Cricut cartridge.